
Netgear Powerline 1000

 The NETGEAR PowerLine 1000 is an excellent replacement for Ethernet wire. It enables you to connect your device to any power outlet and plug it into the adapter to extend the range of your wired connection to any room. However, if you are a new NETGEAR PowerLine user, you may encounter difficulties when attempting to configure your PowerLine adapters. As a result, this article will walk you through the step-by-step process of configuring NETGEAR PowerLine 1000.

  How To Setup The NETGEAR Powerline 1000 Netgear Powerline 1000 Setup 
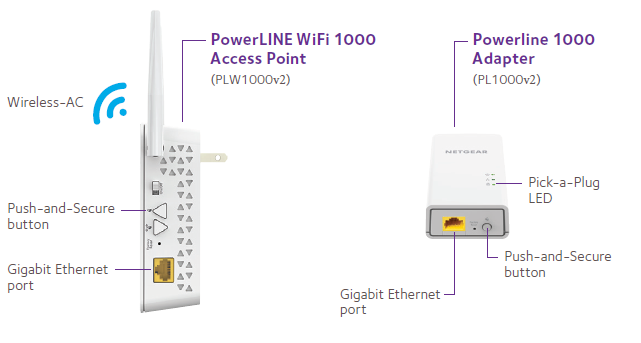
PowerLine adapters boost your internet access while also establishing a secure network connection between your devices. Connect your PowerLine to your existing electrical wiring in your home and connect it to the adaptor. You may use this handy device to wirelessly link your gaming consoles, smart TVs, and streaming devices for a more personalized experience.   As a result, before you can set up your NETGEAR PowerLine 1000, you must first install your adapters.  
  • Connect your new adaptor to a power outlet.
  • Use direct sockets rather than extension cords, power strips, or surge suppressors.
  • Check that the Pick a Plug LED light on your adaptor is turned on.
  • Connect your PowerLine Wi-Fi network to any Ethernet device you want to use.
  • Until this point, your adapter installation is complete.
  Using the WPS button on the PowerLine adapters, you can modify your network settings, change network credentials, extend your network, or connect your PowerLine to an access point. As a result, once you've properly installed the PowerLine adaptor, all you have to do is  
  1. Locate and push the WPS button on one of the PowerLine adapter's edges.
  2. Hold the button for about 2 seconds before releasing it.
  3. Take note of how your Wi-Fi LED light begins to blink.
  4. Wait 2 seconds after pressing the WPD button for the LED to stop flickering.
  5. Your Wi-Fi device is now connected to the PowerLine, and you can configure your PowerLine settings directly from the device.
  6. Open a web browser and type www.mywifiext.net into the address box.
  7. Log in with the default credentials of "admin" and "password."
  8. You can change your Wi-Fi SSID and security key after logging in to the setup page.
If you want to add extra PowerLine adapters:  
  1. If you have not previously set network security, you can simply connect the adapter to the PowerLine.
  2. If you want to use an adapter with a security set, plug the second adapter into a socket near the device.
  3. Connect your device to the adaptor after that.
  4. If your adapter is protected by a private encryption key, press and hold the security button on your first adapter for 2 seconds.
  5. Then, for 2 seconds, press and hold the new adapter's security button. You have now connected an adapter to your existing PowerLine network.
  So, we hope that this comprehensive guide to the Netgear Powerline 1000 Setup will help you install and operate these devices on your own. Also, we hope the troubleshooting steps mentioned can be of help to any layman. For more info, you can visit our website www.wirelessextendersetup.org

Comments

Popular posts from this blog

How to Reset Netgear Extender

This guide gives users, two simple steps through which users can reset their Netgear wifi extender:- Through Web Manual Reset Button We hope that this guide will help our users to solve/fix the problems related to the Netgear wifi extender. Some Precautions That One Must Follow Before Resetting Your Netgear Extender:- Many users trying to reset their Netgear Extender smoothly, but not all are successful. Don't worry, here are some precautions that must be taken in order to successfully  reset netgear extender . Verify that the extender is connected to a dependable power source. To connect your extender, avoid using the Extension cable. Connecting your extender should not be done with worn cables. Why is it important to take these precautions? It is important because any damaged or weak point can interrupt the connection, and if the connection is interrupted during the reset process, it may not be suitable for many users as it may damage the firmware or memory of your device. There ...

How To Do The Setek WiFi Extender Factory Reset?

  Are you sick of your home's network dead spots? Tired of hopping from location to location in search of internet signals? Your problems can be all but eliminated with the Setek wifi range extender. In addition to stronger signals, it is renowned for its wide network coverage. There are no longer any dead zones because it can cover up to 2500 square feet. However, a setek factory reset is necessary if your Setek extender is still not functioning despite numerous attempts. Here, we'll explain to you how to do the setek wifi extender factory reset Steps To Setup Setek Wifi Range Extender With Wifi Router- Let's look at how the Setek wifi range extender is connected to your wifi network before getting into the reset procedures. Read through the following instructions to set up your Setek wifi range extender. It is connected to the wifi router via an ethernet connection. Connect your wifi extension and router to the power outlet first. Make sure the extension and router are lo...

Know Everything About 192.168.10.1 Login

  Are you facing issues while accessing the default IP address 192.168.10.1 for repeater setup? Wondering how to perform wireless repeater setup using 192.168.10.1 Login Admin ? If so, don’t panic! You have reached the right place. Here, you will get to know the simplest ways to configure 192.168.10.1 Admin . Basically, it is the default IP address that enables you to access the management interface of the device. It is also used to modify WiFi settings, security settings, and WiFi passwords. Before going further, you have to know about 192.168.10.1 Login .  Instructions for 192.168.10.1 Login Admin- If you know the router IP address or default gateway IP, you can easily get into the 192.168.10.1 Login admin interface of your router/modem. If your router's default gateway IP is 192.168.10.1, you can access the router's admin interface by following these steps:  Step 1 : Use an ethernet cable or a wireless connection to connect to your router's network. Step 2 : Open a web...